MyDigitalSSD M2X M.2 NVMe SSD Enclosure Review - A PCIe to USB Storage Bridge
by Ganesh T S on October 31, 2018 8:00 AM EST- Posted in
- Storage
- SSDs
- USB 3.1
- NVMe
- Type-C
- Storage Bridge
- External SSDs
Miscellaneous Aspects
The thermal design of external storage enclosures has now come into focus, as high-speed SSDs and interfaces such as USB 3.1 Gen 2 can easily drive up temperatures. This aspect is an important one, as the last thing that users want to see when copying over, say, 100 GB of data to the drive inside the enclosure, is the transfer rate going to USB 2.0 speeds. In order to identify the effectiveness with which the enclosure can take away heat from the internal drive, we instrumented our robocopy DAS benchmark suite to record various parameters while the robocopy process took place in the background. Internal temperatures can only be gathered for enclosures that support S.M.A.R.T passthrough. Readers can click on the graphs below to view the full-sized version. We see that the USB 3.1 configuration finished our benchmarks faster, and the temperature of the internal SSD topped out at 56C. The USB 3.0 case took longer, but, the temperature topped out at 54C. On the other hand, the temperature barely touched 48C when the same benchmark was run using a USB 2.0 port in our testbed.
| Storage Enclosure Thermal Characteristics | ||
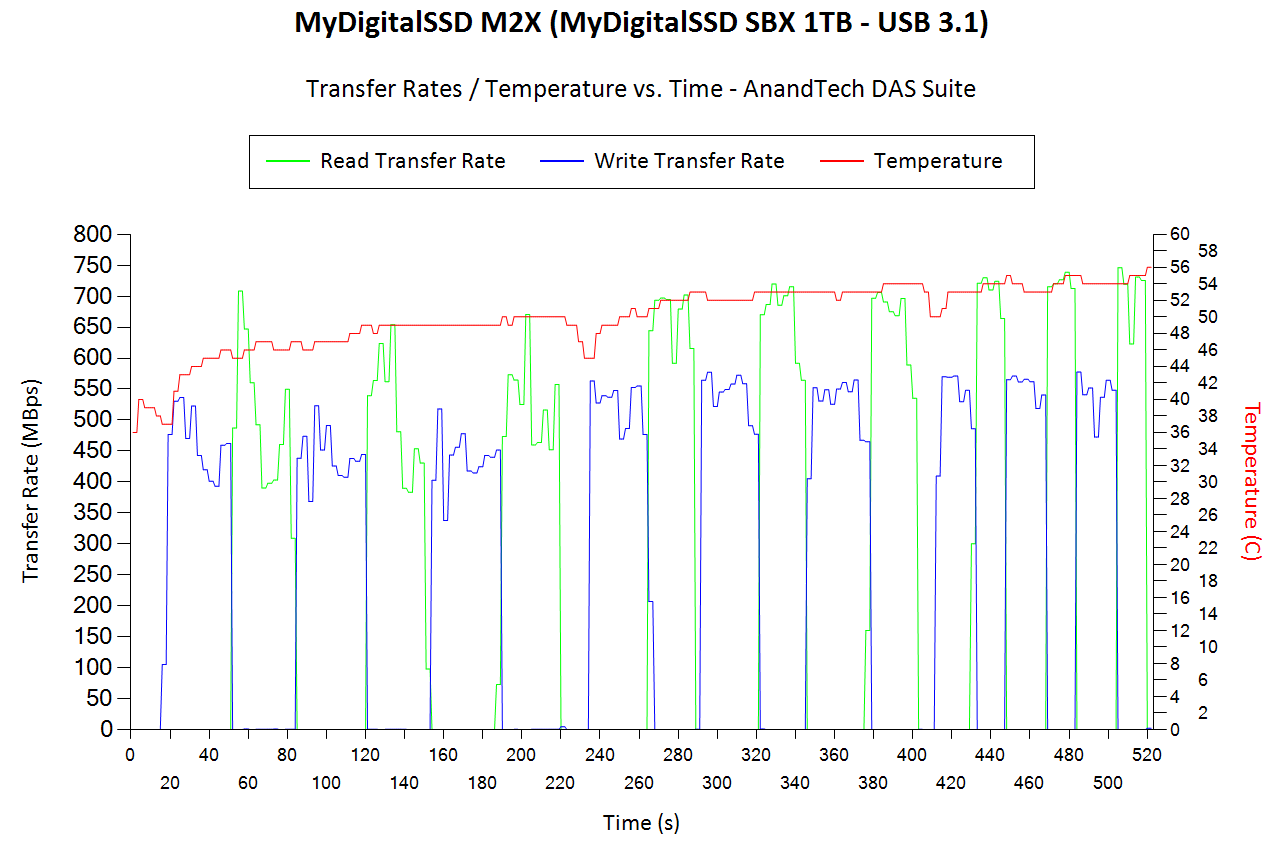 |
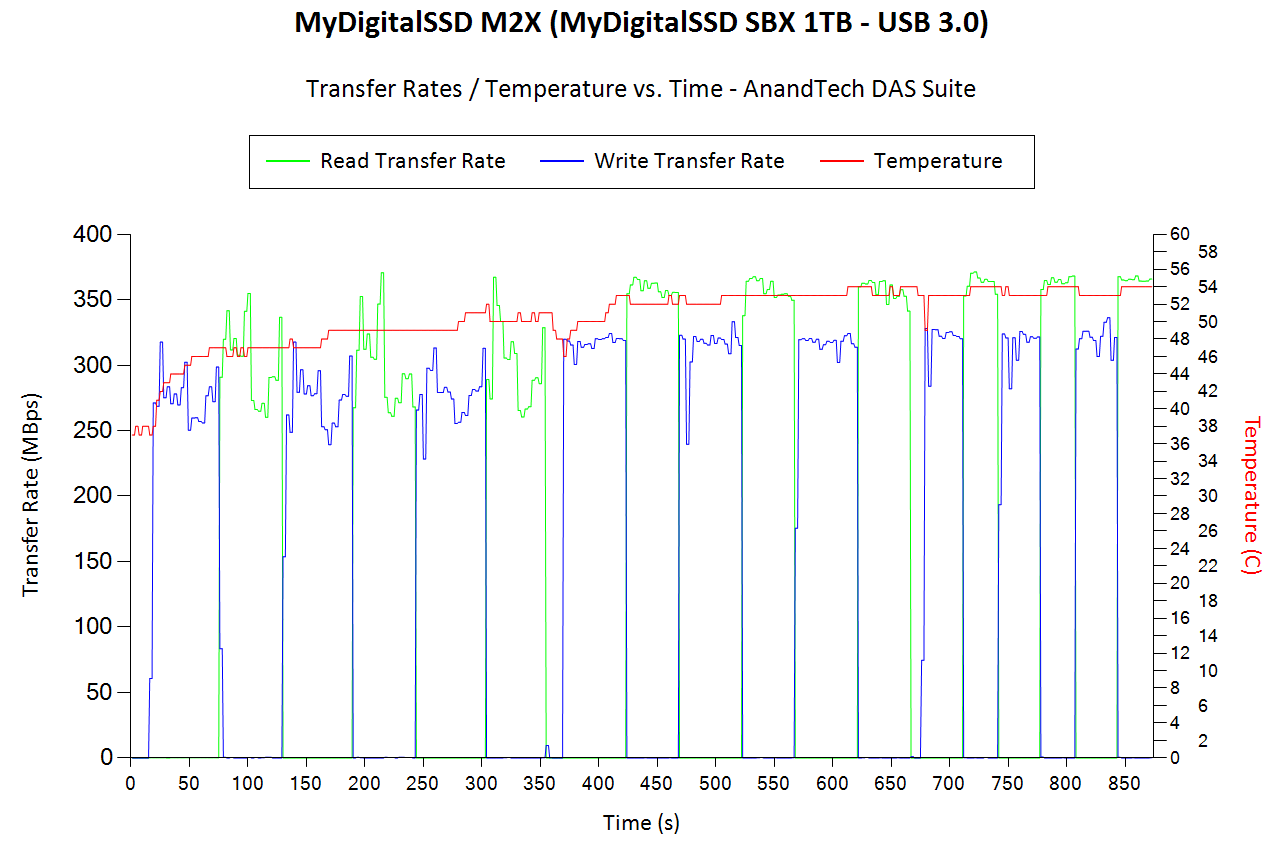 |
|
It is challenging to isolate the power consumption of the storage bridge alone while treating the unit as a black box. We strive to present results in a comparative manner, but, this being the first M.2 NVMe to USB 3.1 Gen 2 enclosure, we can only compare the numbers when different interfaces (USB 3.1 / USB 3.0 / USB 2.0) are used. The numbers for the other storage bridges are only given for reference. Towards this, we processed the same workloads for each case (CrystalDiskMark 5.1.2's benchmark traces with a region size of 8GB and the number of repetitions set to 5). Plugable's USBC-TKEY power delivery sniffer was placed between the host PC and the storage bridge to record the power consumption.
| Power Consumption - CrystalDiskMark | ||
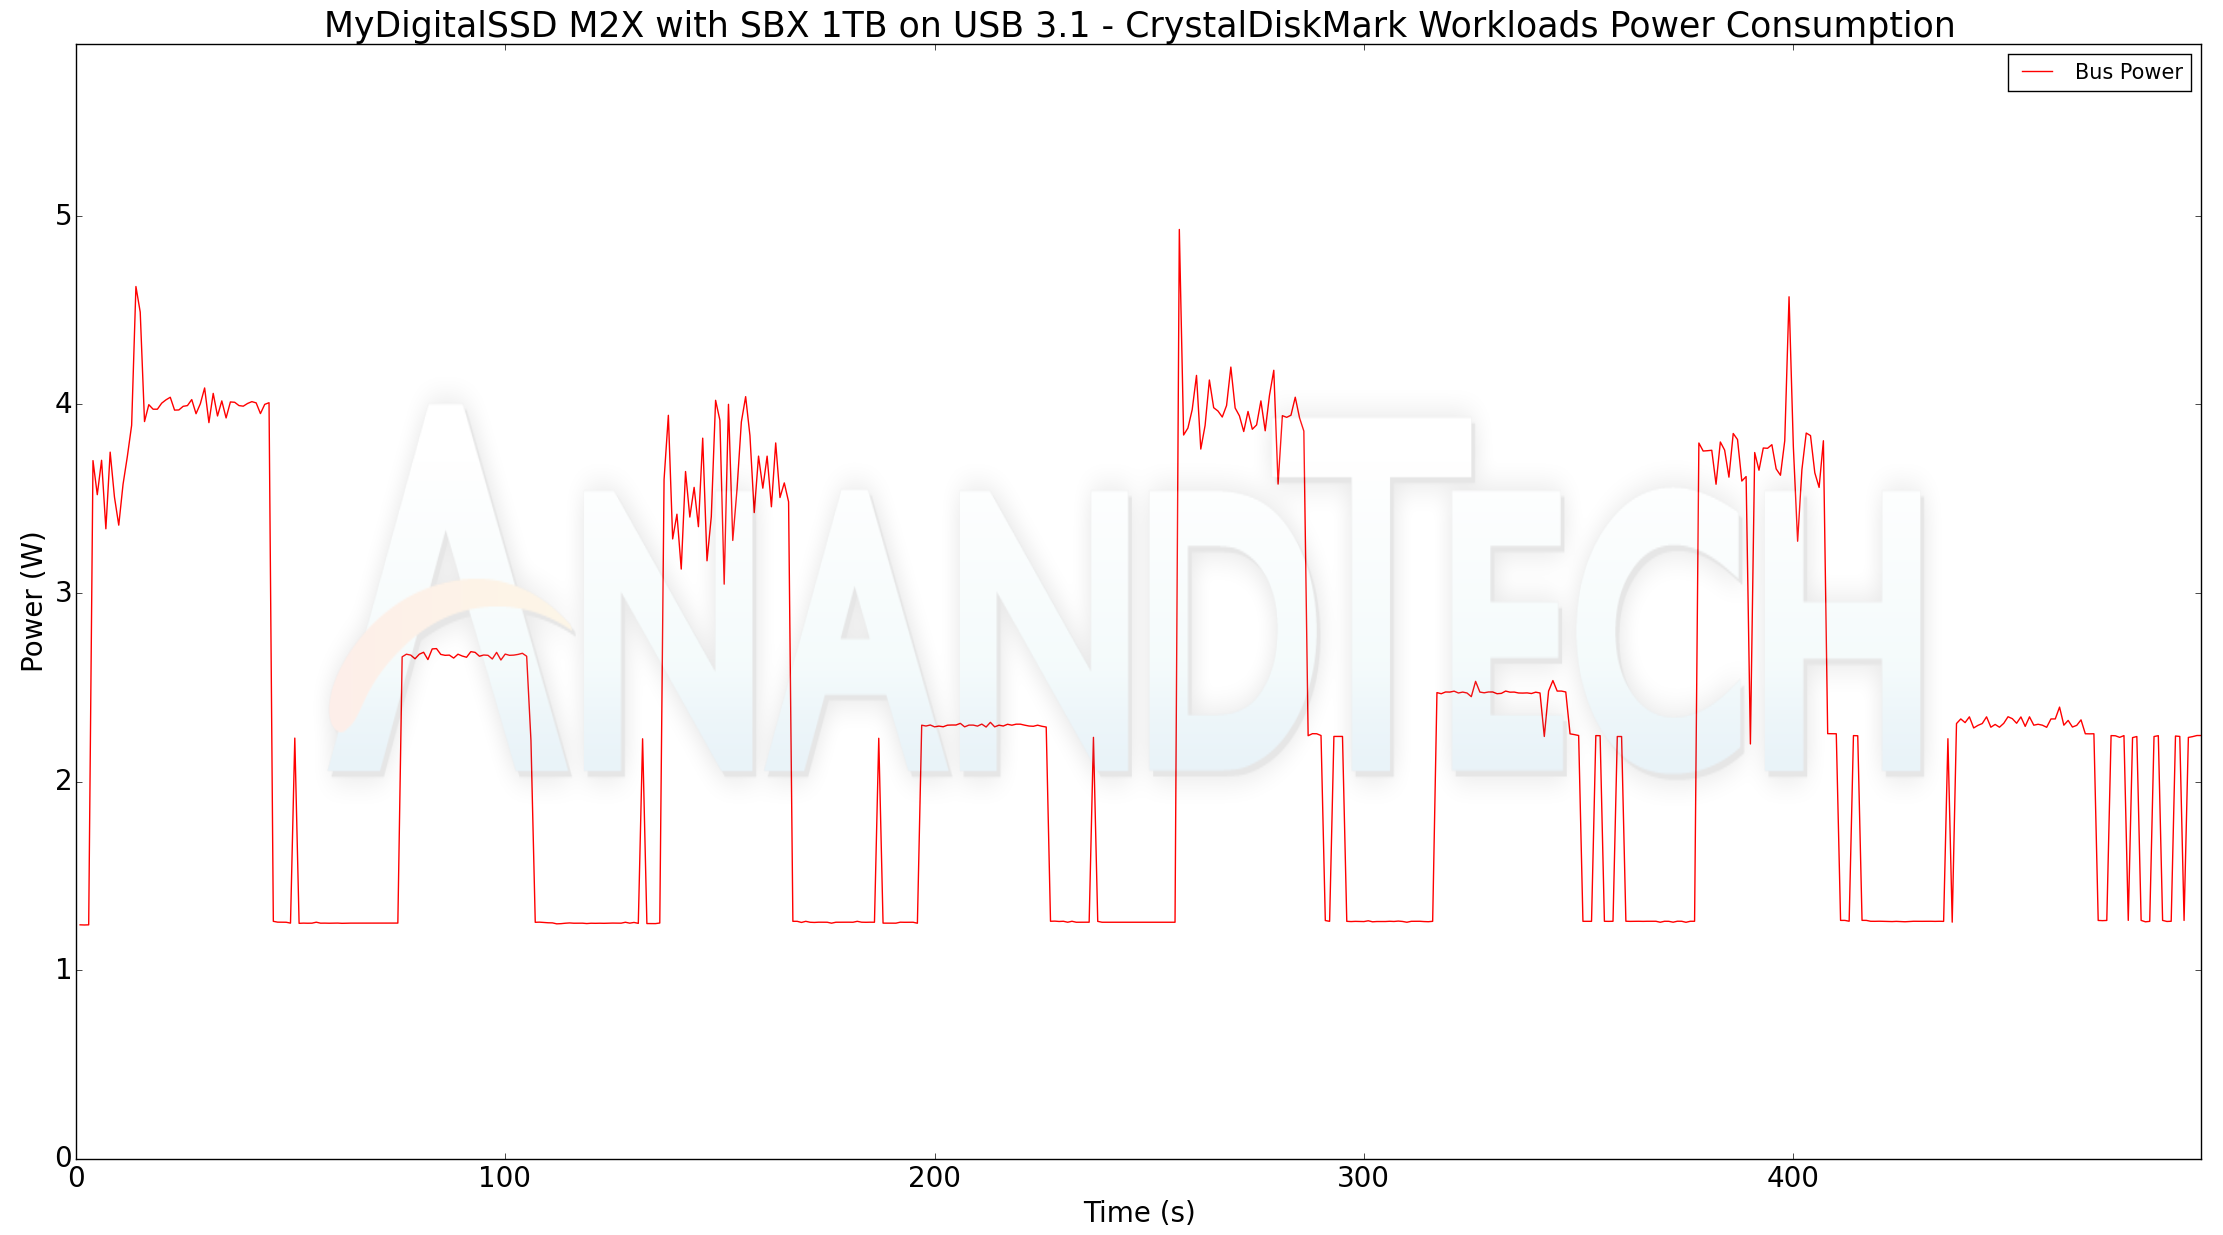 |
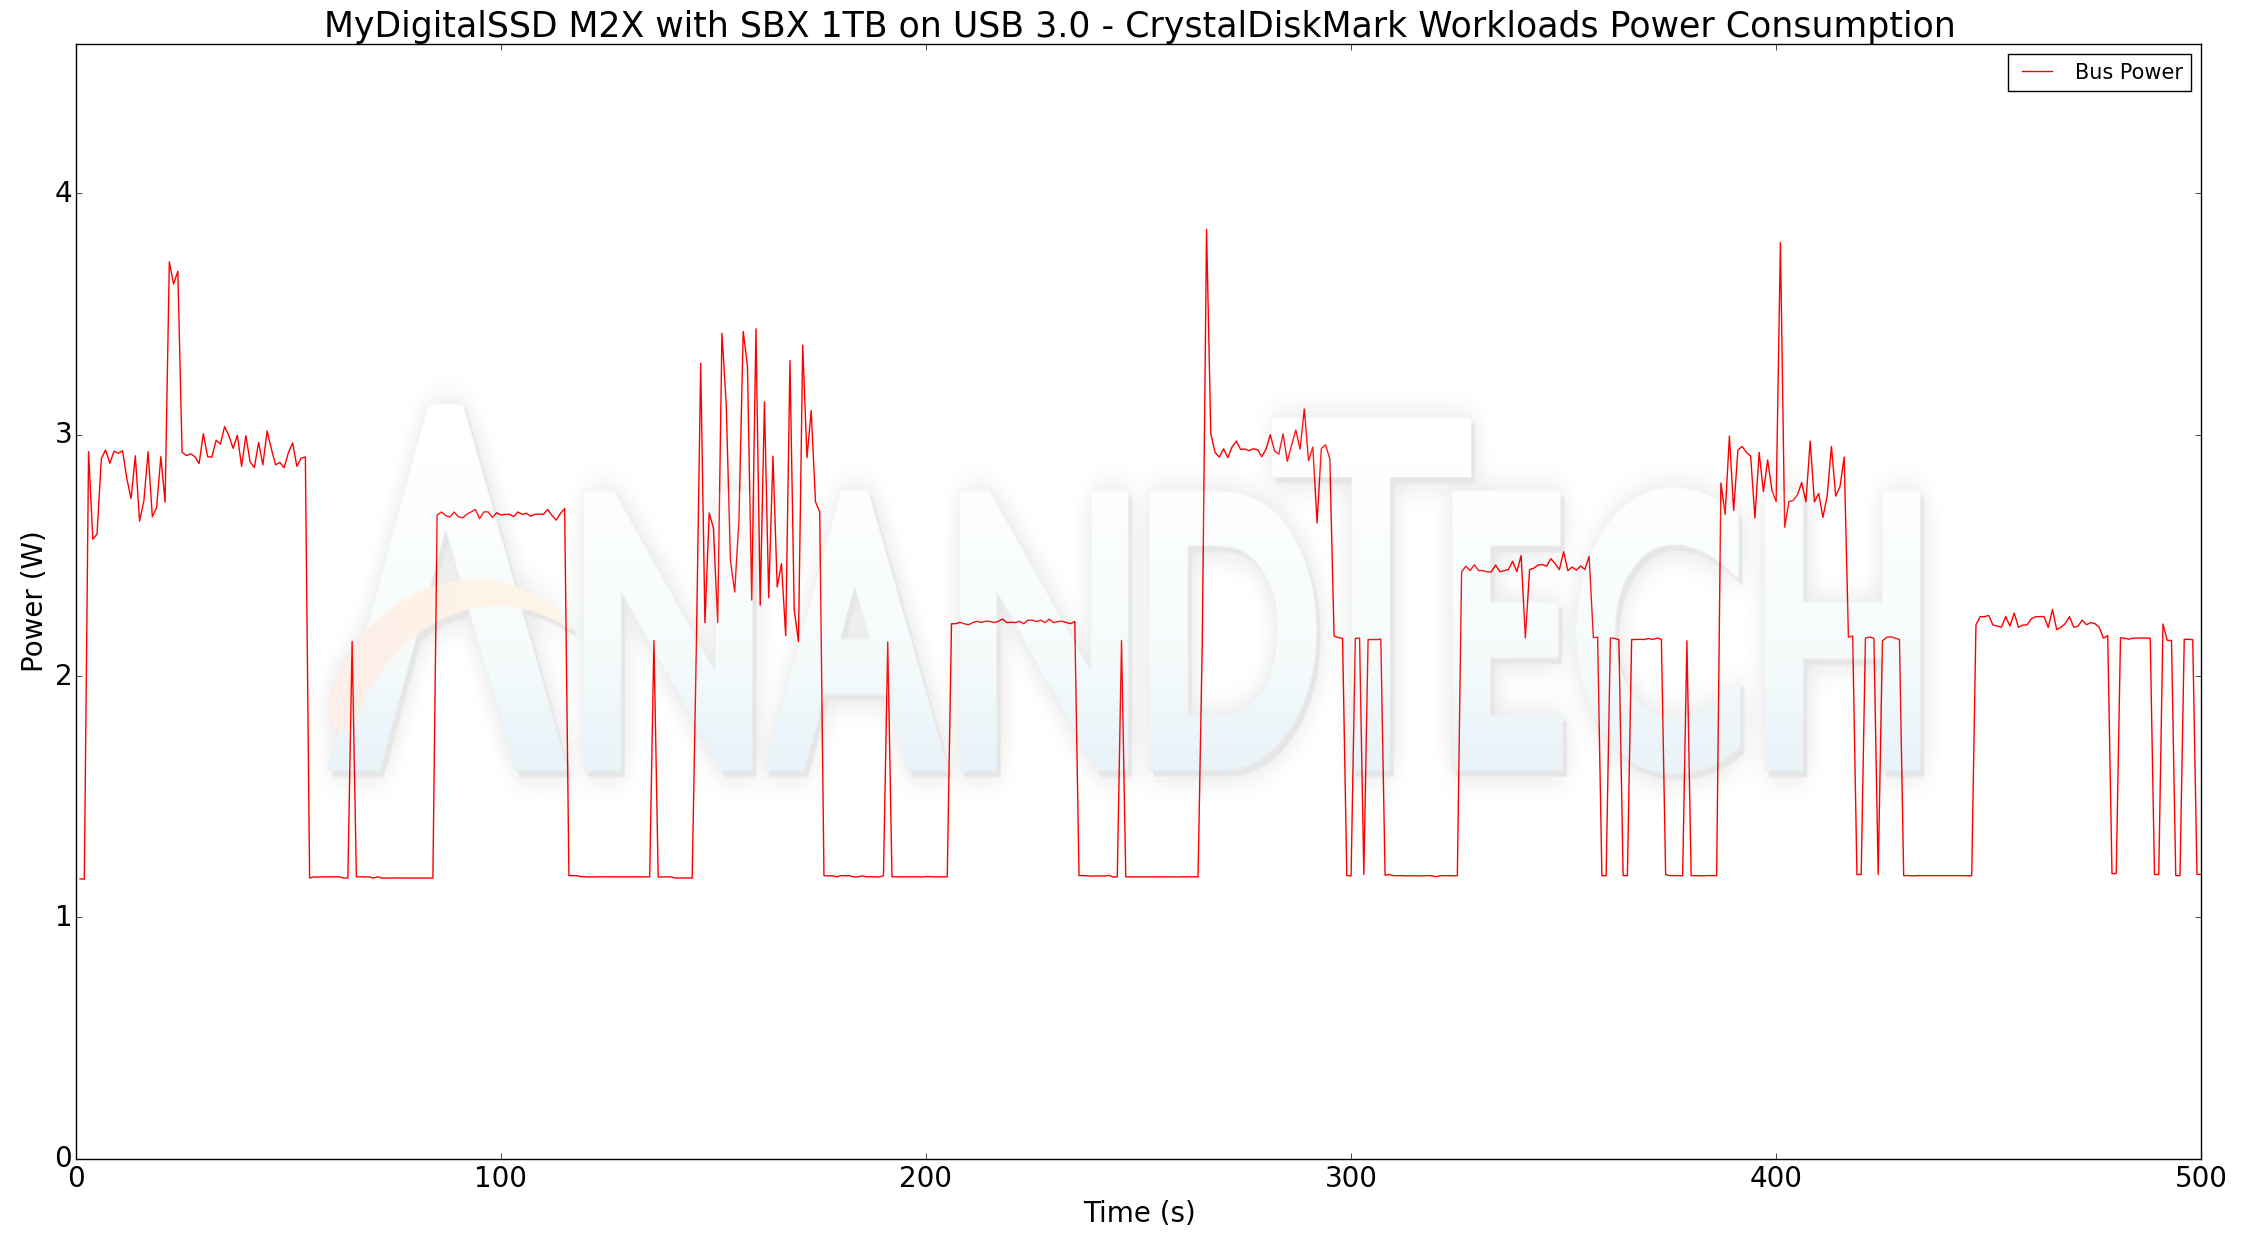 |
|
Over USB 2.0, the power peaked at 2.8W, while the unit idled at 1.1W. The numbers for the USB 3.0 and USB 3.1 cases were 3.9W / 1.2W and 5W / 1.25W respectively.
SATA - USB storage bridges that support UASP fully can translate the SCSI UNMAP command to TRIM commands for SSDs connected to the downstream port. In the case of M.2 NVMe - USB storage bridges, the bridge chip has to recognize the corresponding NVMe command and pass it downstream appropriately.
Checking for TRIM support has been a bit tricky so far. CyberShadow's trimcheck is a quick tool to get the status of TRIM support. However, it presents a couple of challenges: it sometimes returns INDETERMINATE after processing, and, in case TRIM comes back as NOT WORKING or not kicked in yet, it is not clear whether the blame lies with the OS / file system or the storage controller / bridge chip or the SSD itself. In order to get a clear idea, our TRIM check routine adopts the following strategy:
- Format the SSD in NTFS
- Load the trimcheck program into it and execute
- Use the PowerShell command Optimize-Volume -DriveLetter Z -ReTrim -Verbose (assuming that the drive connected to the storage bridge is mounted with the drive letter Z)
- Re-execute trimcheck to determine status report
Conclusions can be made based on the results from the last two steps.

As JMicron claims in their marketing material for the JMS583, the M2X enclosure using it has no trouble activating TRIM on the installed SSD.
In the introductory section, I had mentioned that it is very important to ensure that the SSD being used has an appropriate active state power profile. In order to ensure wide compatibility, the enclosure along with the SSD must stay within the minimum guaranteed USB 2.0 power delivery envelop (Update: 500mA @ 5V, corresponding to 2.5W for USB 2.0, and 900mA @ 5V, corresponding to 4.5W corresponding to USB 3.x). Now, it must be noted that the JMicron JMS583 main board, by itself, consumers around 700 mW when active. This leaves around 3.8W for the M.2 NVMe SSD. (Update: Note that this is for connection to a USB 3.x port)


The gallery above presents the active power states information for all the M.2 NVMe SSDs that I had available for testing. All of them worked well in the enclosure. However, I did find one Amazon review indicating the inability to use an Intel 600p SSD inside the M2X. Billy, our SSD reviewer, sent over the supported power states table for the Intel 600p, and it turned out that the lowest active power state was configured by the firmware to be 3.8W. Though it is likely that the SSD would never hit it when operating with a PCIe 3.0 x2 link, we believe that the JMicron bridge chip / firmware takes into account the nature of the USB host as well as the available active power states in the SSD to ensure safe and reliable operation under all possible circumstances. As it stands, as long as the SSD being installed has a sub-3.8W active power state, it should be good to use in the M2X enclosure connected to a USB 3.x port. (Update: Even with USB 2.0 ports, the enclosure with a PCIe 3.0 x2 SSD stays below 2.5W throughout except for a small spike in one of the workloads. It is possible that some legacy systems or power-constrained USB 2.0 ports could have trouble with the enclosure under some specific workloads. However, almost all users are going to be using this enclosure with a USB 3.x port, and we believe this is a minor issue compared to the internal SSD itself not supporting a suitable power state)
Closing Thoughts
Coming to the business end of the review, the M2X enclosure is priced at around $40, depending on the retailer. And while MyDigitalSSD can't claim to be the first vendor to be shipping a JMS583-based bridge – there are plenty of questionable imports available at Amazon and elsewhere – they are the first vendor with a significant North American presence to do so. Which means that, at least for the moment, they're holding the high ground in this market, helped all the more by the fact that the M2X is a complete consumer-friendly package with the appropriate screwdriver and other tools & cables required.
The end result is that MyDigitalSSD has a unique product in the North American market (for now) at the right price point. It might make sense for MyDigitalSSD to also offer a pre-built external SSD similar to the configuration we used (A DIY MyDigitalSSD SBX + M2X, which is at $256 for the 1TB version). Even at the DIY price, the configuration simply blows away the SanDisk Extreme Portable ($210) and the Samsung T5 ($228) in the performance per dollar metric while retaining the same compatibility across a wide range of host systems.


39 Comments
View All Comments
RoC_17 - Wednesday, October 31, 2018 - link
Thanks for this review, a niche category which I had my eyes upon for a while.Still, I would prefer to have an alternative mounting mechanism for the SSD inside the enclosure for better thermal handling.
Sliding in means that attaching thermal pads is not possible, but thermals surely would benefit from that. Why not have a top cover with 4 low profile screws for exactly that reason?
woggs - Wednesday, October 31, 2018 - link
Bingo. I bought one but really need to ensure a solid thermal connection from the controller on the drive to the case or it will overheat. I ended up not using the case that came with it and bought a separate M.2 heatsink kit with proper thermal adhesive to make solid contact to the asic on the drive. Now it works great.woggs - Wednesday, October 31, 2018 - link
To be clear, I tried the original case and the drive hung (thermal shut down) during sustained writes....Clarkage - Wednesday, October 31, 2018 - link
The instructions show a thermal pad that's to be installed on top of the drive before sliding it in. Did your case have this / did you use it ? I'm certainly not convinced that's it's sufficient heat sinking but was curious about your particular situation.Also, what drive was it? [just curious]
woggs - Wednesday, October 31, 2018 - link
Well crap. I did not get one (or I've forgotten already).weevilone - Thursday, November 1, 2018 - link
Mine came with the thermal interface, but it was so sticky that I couldn't slide the enclosure over the drive with the material in place.weevilone - Thursday, November 1, 2018 - link
Can you share what you wound up using? I sent mine back after failing to get the included thermal interface to work with the sliding case.jabber - Wednesday, October 31, 2018 - link
I need to get one of this type of adapter for testing and build cloning. Currently having to use a PCI-e card and it's a pain.Mikewind Dale - Wednesday, October 31, 2018 - link
What excites me is that now I can easily clone my laptop's NVMe SSD to a new one before upgrading the SSD, without having to do a bunch of workarounds (like finding a desktop with multiple M.2, or cloning to SATA as a middleman).SonnyCrockett84 - Thursday, November 1, 2018 - link
Which is exactly what I did with my Dell XPS 15 9575 2in1, went from a 256 to a 512. I bought mine from Aliexpress on September 13th, though, 32 bucks, from JEYI, took a couple of weeks to get here, no biggie. Here's the link https://www.aliexpress.com/item/-/32874418125.html